
To use a tile cutter for DIY projects, start by measuring and marking your tile accurately. Secure the tile on the cutter’s base and align the mark with the cutting wheel. Score the tile with steady, firm pressure, then use the built-in lever or handle to snap it along the scored line. Keep the tool clean, inspect the cutting wheel regularly, and practice to improve your precision. Keep going to discover more tips for perfect cuts.
Key Takeaways
- Measure and mark the tile accurately along the cut line with a pencil or chalk.
- Securely position the tile on the cutter’s base, aligning the marked line with the cutting wheel.
- Apply firm, steady pressure to score the tile in a single smooth pass along the marked line.
- Use the lever or handle to snap the tile along the scored line carefully.
- Regularly inspect and maintain the cutter, replacing dull wheels and cleaning after use for optimal performance.
When tackling a DIY tiling project, using a tile cutter is an essential step that can make the process smoother and more accurate. Before you start, it’s important to prioritize tile safety. Always wear safety glasses to protect your eyes from shards, and use gloves if necessary to avoid cuts. Keep your workspace clear of clutter, and ensure good lighting so you can see your cuts clearly. Handling the tile cutter properly and responsibly reduces the risk of accidents and guarantees precise cuts, helping your project turn out neatly.
Tool maintenance plays a critical role in achieving clean, accurate cuts and prolonging the life of your tile cutter. Regularly inspect your tool for any damage or wear, especially the cutting wheel, which can become dull over time. A sharp wheel produces cleaner cuts, reducing the chance of tile chipping or breaking. Clean the cutter after each use to remove dust, debris, and any adhesive residue. Lubricate moving parts as recommended by the manufacturer to keep everything functioning smoothly. Proper maintenance not only improves the quality of your cuts but also keeps you safe by preventing unexpected tool failures during a project.
When you’re ready to cut, measure and mark the tile carefully with a pencil or chalk. Use a straightedge or measuring tape to draw a clear, straight line that guides your cut. Position the tile securely on the cutter’s base, aligning the mark with the cutting wheel. Apply firm, even pressure as you score the tile by sliding the wheel along the marked line. Avoid pressing too hard — a steady, controlled pass is all you need to score the surface properly. Once scored, use the lever or handle to snap the tile along the score line. With some practice, you’ll find that this method produces clean, precise cuts.

DEWALT Wet Tile Saw with Stand, 10 Inch, 15-Amp, 1,220 MWO, Corded (D36000S)
Cutline indicator, rigid frame, and stainless-steel rollers provide cutting accuracy to within 1/32 in. over 30 in. cuts
As an affiliate, we earn on qualifying purchases.
Frequently Asked Questions
Can I Cut All Types of Tiles With a Manual Tile Cutter?
You can’t cut all types of tiles with a manual tile cutter. It works well for ceramic and some porcelain tiles, but it’s not suitable for glass, natural stone, or very thick tiles. To get the best results, choose the right tile cutter for your project and keep it in good condition. Regular tile cutter maintenance ensures clean cuts and prolongs its lifespan, making your DIY tiling smoother and more efficient.
How Do I Prevent Chipping When Scoring Tiles?
To prevent chipping when scoring tiles, focus on proper tile scoring techniques. Use a sharp, high-quality wheel and apply even, consistent pressure. Make sure you score in a single, smooth motion without pressing too hard, which helps prevent tile damage. Keep the tile and cutter clean, and avoid rushing the process. Practicing these steps guarantees you score tiles accurately, preventing chipping and achieving clean, precise cuts.
What Safety Gear Should I Wear During Cutting?
Think of your safety gear as a shield protecting you from flying debris. You should always wear safety glasses to guard your eyes and gloves to keep your hands safe from sharp edges. These essentials help prevent injuries during cutting. Remember, a little precaution goes a long way. Always double-check your gear before starting, so you can focus on your project without worry. Safety first guarantees your DIY tiling stays enjoyable and injury-free.
How Do I Measure and Mark Tiles Accurately?
To measure and mark tiles accurately, use proper measurement techniques like measuring twice to confirm dimensions. Select reliable marking tools such as a pencil or a chalk line. Carefully mark your measurements on the tile surface, making sure straight lines that match your measurements. Use a ruler or a square for precision, and double-check your marks before cutting. Precise marking ensures clean cuts and a professional finish for your tiling project.
How Do I Cut Curved or Irregular Tile Shapes?
To cut curved or irregular tile shapes, you’ll need a wet tile saw or a tile nipper. For curved cuts, mark the curve clearly and use a wet saw with a fine blade or carefully nibble away with the nippers. For irregular shapes, sketch your pattern first, then slowly cut along the lines, adjusting as needed. Always wear safety gear to protect your eyes and hands during these precise cuts.
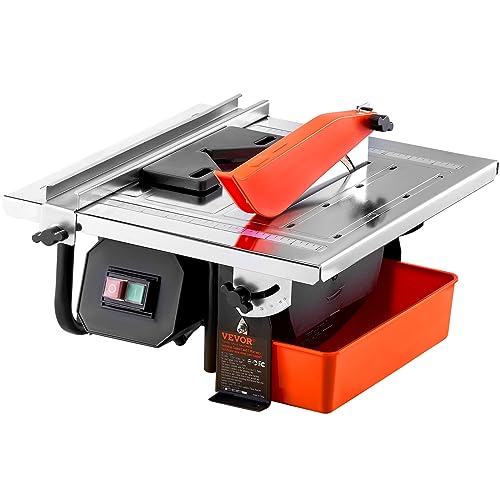
VEVOR 7-inch 65Mn Steel Blade, Wet Tile Saw, 3500 RPM Induction Motor, Tile Cutter Wet Saw with Water Reservoir, 0-45 Degrees Miter Angle for Cutting Tiles and Stones, for DIY Enthusiasts
0-45° Angle and Deep Cutting: The VEVOR wet tile saw provides adjustable cutting angles from 0 to 45...
As an affiliate, we earn on qualifying purchases.
Conclusion
Now, armed with your tile cutter, you’re ready to transform your space with precision and confidence. While the tool offers clean cuts and professional results, don’t forget that patience and care are your best allies. Just as a sharp blade slices effortlessly through tile, a careful approach guarantees your project turns out beautifully. So, embrace the process—crafting a polished finish is both an art and a skill. Happy tiling!

PORTER-CABLE Tile Saw, Wet Saw with 7-inch Cutting Capacity and On-Board Cutting Guide (PCE980)
Onboard miter square to help line up miter cuts and repeatable rip cuts
As an affiliate, we earn on qualifying purchases.
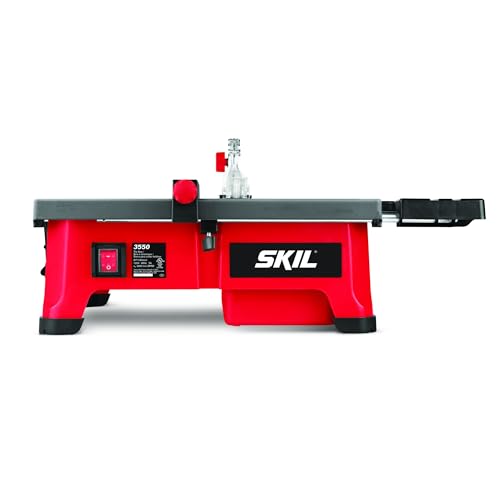
Skil 3550-02 7-Inch Wet Tile Saw with HydroLock Water Containment System
Hydro lock water containment system keeps water contained near the blade and reduce clean-up time
As an affiliate, we earn on qualifying purchases.