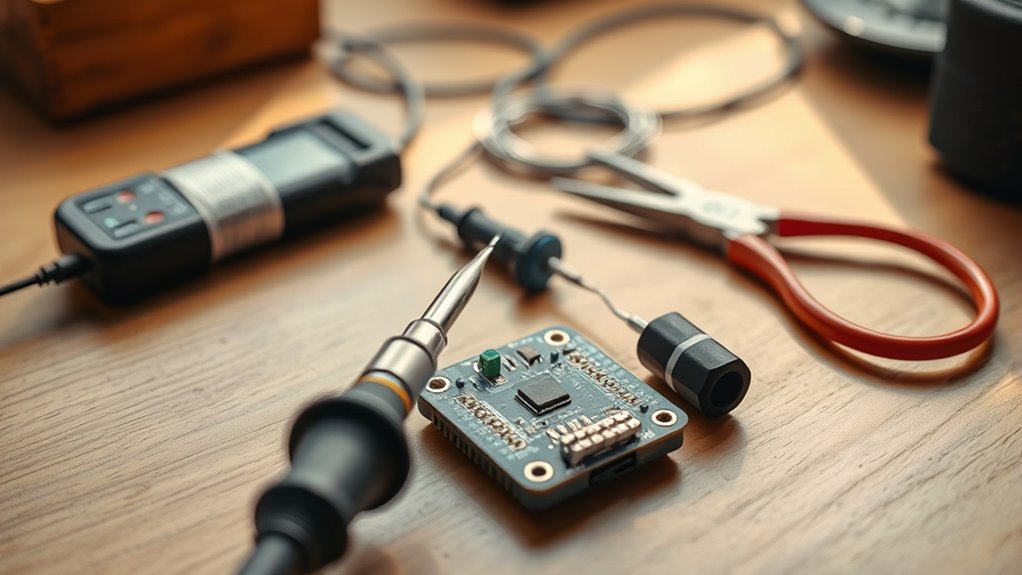
To start soldering, gather essential tools like a fine-tip soldering iron with adjustable temperature, rosin-core solder, tweezers, and a damp sponge. Choose an iron that’s easy to control and maintain it well. Always work in a ventilated space, handle hot parts carefully, and avoid common mistakes like using too much solder. Practice simple projects to build confidence—keep going, and you’ll master the skills needed for successful soldering.
Key Takeaways
- Use a good soldering iron with adjustable temperature control for precision and safety.
- Prioritize a well-ventilated workspace to reduce fumes and ensure safety during soldering.
- Practice simple projects like LED circuits to build confidence and improve technique.
- Keep the soldering iron tip clean and maintain proper heat settings to ensure quality joints.
- Always handle hot components with tools or gloves, and follow safety guidelines for effective soldering.
Essential Soldering Tools You Need to Get Started

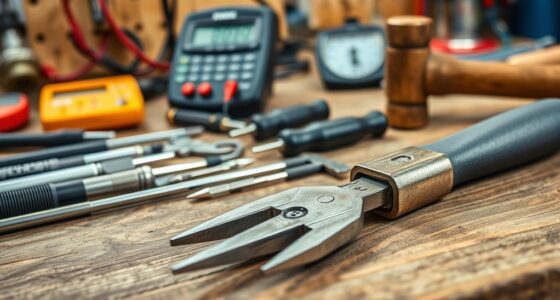
To get started with soldering, you’ll need a few essential tools. First, a good soldering iron is vital for melting solder onto the soldering metal and creating solid connections. A fine-tip soldering iron helps you work precisely, especially on small circuit board components. You’ll also need solder wire, preferably rosin-core, designed for electronics. Tweezers are helpful for holding tiny parts steady during soldering. A damp sponge cleans the soldering iron tip, ensuring good heat transfer. A wire cutter trims excess solder and leads. Finally, a helping hand or third-hand tool can hold your circuit board securely in place. These tools are fundamental for creating reliable, clean solder joints and ensuring your project progresses smoothly. Additionally, understanding the importance of Free Floating in maintaining stability during soldering can help improve your results. Properly grounding your work, for example, can prevent static damage and ensure safety during soldering. Incorporating proper technique and patience will further enhance your soldering quality and safety, emphasizing the significance of creative storytelling in effectively conveying your project’s purpose. Using vetted tools can also prevent common mistakes and improve overall success in your soldering projects.
Choosing the Right Soldering Iron for Beginners

When choosing a soldering iron, you should consider the different types available and how their features match your projects. Look for models with adjustable temperature controls to give you more precision, especially as you learn. Luckily, there are budget-friendly options that offer great performance without breaking the bank. Additionally, selecting a textile line soldering iron can be beneficial if you plan to work on fabric-based projects or delicate components.
Types of Soldering Irons
Choosing the right soldering iron is essential for beginners, as it can make the learning process smoother and more enjoyable. There are different types of soldering irons, such as pen-style, station models, and cordless options. Pen-style irons are lightweight and portable, perfect for small projects, while station models offer better temperature stability and more precise control. Cordless irons provide mobility but may lack power for larger tasks. When selecting a soldering iron, consider ease of use and your project needs. Proper soldering iron maintenance, like cleaning the tip regularly and checking connections, helps guarantee consistent performance and extends your tool’s lifespan. Understanding the different types of soldering irons helps you choose the best fit and develop good habits early on. Additionally, selecting a soldering iron with local automation features can enhance your workflow, especially when working on multiple projects or integrating with other tools.
Temperature Control Features
Selecting a soldering iron with adjustable temperature control helps you work more accurately and safely. With temperature adjustment, you can set the iron to the ideal heat level for different tasks, reducing the risk of damaging components. Look for models that offer precise control, so you can fine-tune the heat as needed. Heater stability is also essential; a stable heater maintains a consistent temperature, ensuring reliable soldering without fluctuations. This stability helps you achieve cleaner joints and prevents overheating. Avoid irons with limited or no temperature control, as they can be difficult to use effectively. By choosing a soldering iron with good temperature adjustment and heater stability, you’ll gain better control and improve the quality of your first soldering projects. Proper temperature regulation is crucial for achieving professional results and protecting sensitive components. Additionally, selecting an iron with temperature control features can help you adapt to various soldering tasks efficiently.
Budget-Friendly Options
If you’re just starting out, finding an affordable soldering iron that still performs well is essential. Luckily, there are many budget-friendly options available that fit into affordable soldering kits or DIY soldering setups. Look for a soldering iron with a reliable temperature control feature, even if it’s basic, to help you learn proper techniques. Many entry-level models offer adjustable heat settings, making them suitable for different projects. You don’t need the most expensive tool to get started; instead, focus on a well-reviewed, beginner-friendly option that provides good heat stability and safety features. These affordable soldering kits often include essential accessories, allowing you to practice without breaking the bank. Starting with a cost-effective tool helps you build skills while staying within your budget. Additionally, choosing a soldering iron compatible with soldering accessories can enhance your overall experience and expand your project possibilities.
Basic Techniques for Effective Soldering

To solder effectively, mastering some basic techniques is essential. First, focus on clean surfaces and proper flux application techniques. Applying flux helps remove oxidation and ensures a good bond between components, improving solder joint quality. Use just enough flux—too much can cause bridging, while too little may lead to weak connections. Keep your soldering iron at the right temperature, typically around 350°C (662°F), to melt solder smoothly without damaging components. When applying solder, feed it into the joint rather than directly onto the iron tip, allowing capillary action to do the work. Maintain steady hand movements and avoid overheating parts. Additionally, understanding the importance of clean surfaces can significantly impact the success of your soldering projects. With practice, these techniques will produce strong, reliable solder joints and elevate the quality of your projects.
Safety Tips to Keep in Mind During Your Projects

Safety should always come first when soldering, so wear protective gear like goggles and gloves to shield yourself from burns and fumes. Make sure your workspace is well-ventilated to avoid inhaling harmful fumes, and handle hot components with care to prevent accidents. Additionally, understanding safety guidelines for electrical work can help you avoid common hazards. Following these tips keeps your project safe and enjoyable.
Wear Protective Gear
Wearing protective gear is essential to keep yourself safe while soldering. It shields you from burns, eye injuries, and harmful fumes. Always wear protective eyewear to prevent sparks or molten solder from hitting your eyes. Heat resistant gloves protect your hands from high temperatures and accidental splashes. Additionally, consider using a long-sleeved shirt to minimize skin exposure, and work in a well-ventilated area to avoid inhaling fumes. Keep a fire extinguisher nearby just in case. Remember, safety equipment isn’t just optional—it’s a crucial part of a safe soldering setup. Proper airflow around your workspace can help disperse fumes and improve safety. Using safety equipment not only protects you but also helps maintain a secure environment for your projects. Ensure your workspace has adequate ventilation, as it significantly reduces inhalation risks associated with soldering fumes. Incorporating proper safety procedures can further minimize accidents and promote a safer soldering experience. By taking these precautions, you can focus on your project with confidence and avoid unnecessary accidents. Stay protected, stay safe, and enjoy soldering with peace of mind.
Work in Ventilated Area
Have you ever considered how fumes from soldering can impact your health? Working in a well-ventilated area is essential for safety. Adequate ventilation helps disperse harmful fumes and improves odor control, making your workspace safer and more comfortable. Use a fume extractor or work near an open window to keep fumes away from your face. Proper airflow reduces the risk of inhaling soldering smoke and chemicals.
| Ventilation Method | Benefits | Best Use Case |
|---|---|---|
| Fume Extractor | Removes fumes directly | Indoor soldering projects |
| Open Window | Cost-effective, natural | Quick, small jobs |
| Ventilation Fan | Enhances airflow | Larger, continuous workspaces |
Prioritize good airflow for safer soldering sessions.
Handle Hot Components Carefully
When working with soldering irons and hot components, it’s easy to forget how quickly things can become dangerous if you’re not careful. Handling hot components requires your full attention to avoid burns or damage. Always use tweezers or tools to move and handle hot parts, and don’t touch them directly. Keep your work area clear of clutter to prevent accidental contact. Remember to unplug your soldering iron when not in use and let hot components cool before handling them again. Follow these safety precautions to protect yourself and your project:
- Use heat-resistant gloves when necessary
- Keep a safe distance from hot surfaces
- Never rush handling hot components
- Work on a stable, non-flammable surface
- Stay focused and avoid distractions
Common Mistakes and How to Avoid Them

One of the most common mistakes beginners make is applying too much solder, which can create bridges between connections and cause short circuits. To avoid this, use just enough solder to form a good connection without excess. Cold solder joints are another issue; they happen when the solder doesn’t heat properly, resulting in a weak, unreliable connection. Make sure your soldering iron is hot enough and that you heat both the component lead and pad evenly. Overheating components is also a mistake that can damage sensitive parts. Keep the heat brief and controlled, and don’t hold the iron on a component for too long. Taking your time and practicing proper technique helps prevent these common errors and ensures safe, effective soldering. Additionally, understanding wiring basics can help you create more reliable and safe solder joints.
Practice Projects to Build Your Confidence
Starting with simple projects is the best way to build your confidence and improve your soldering skills. Practice project ideas like creating a basic LED circuit, assembling a simple electronic keychain, or making a small coin cell battery holder. These confidence building exercises help you master essential techniques without feeling overwhelmed. Focus on steady hand movements, proper heating, and neat solder joints. As you complete these projects, you’ll gain a sense of accomplishment that encourages you to tackle more complex tasks. Remember, repetition and patience are key. Don’t rush—each completed project boosts your skills and self‑assurance for future soldering challenges. Additionally, understanding building your confidence through small successes can motivate you to explore more advanced projects. Developing a steady hand and practicing patience are crucial for achieving neat, reliable solder joints and improving overall soldering quality. Recognizing the importance of consistent practice can further accelerate your learning curve and skill retention. Incorporating deliberate technique improvement ensures steady progress, making each project more manageable. Consistent effort in refining your skills will also help you develop a greater attention to detail, which is essential for successful soldering.
Frequently Asked Questions
How Do I Choose the Right Soldering Iron Wattage?
You should choose a soldering iron wattage based on your projects, generally between 25-60 watts. For delicate electronics, opt for a lower wattage to prevent damage, while higher wattage irons are better for larger projects. Prioritize soldering safety by using proper soldering iron accessories, like stands and heat-resistant mats, and guarantee your iron heats evenly. This will give you control, safety, and quality results during your soldering projects.
What Types of Solder Are Best for Beginners?
Oh, sure, plunge into the world of solder with the most complicated options, or just pick beginner-friendly solder. For simplicity, start with rosin-core solder, which has flux inside, making your job easier. Choose lead-free options if you’re eco-conscious, but be aware they might be a tad trickier to work with. Remember, the right flux type helps your solder flow smoothly, ensuring solid connections without the drama.
How Can I Improve My Soldering Precision?
To improve your soldering precision, focus on honing your soldering technique and maintaining a steady hand. Practice controlling your movements, and keep your hand steady by resting it on a stable surface. Use tweezers or clamps to hold components in place, and make sure your soldering iron is at the right temperature. Taking your time and concentrating will help you achieve cleaner, more precise solder joints.
What Are Common Signs of Cold Solder Joints?
You’ll notice common visual indicators of cold solder joints, like dull, lumpy, or cracked solder, which suggest poor heat transfer. Sometimes, the joint appears incomplete or has a rough surface. To confirm, use electrical testing methods like a multimeter to check for continuity; if it fails, it’s likely a cold joint. Address these issues by reheating and reflowing the solder to guarantee a solid, reliable connection.
How Do I Clean and Maintain My Soldering Tools?
Think of your soldering tools as trusted allies on your creative journey. To keep them in top shape, regularly clean the tips with a damp sponge or brass wire brush, removing oxidation. Store your soldering iron properly, applying a bit of solder to the tip when cooled to prevent corrosion. Prioritize soldering safety by wearing safety glasses and working in a well-ventilated space. Proper maintenance guarantees tool longevity and smooth soldering adventures.
Conclusion
Starting with soldering might seem tricky, but with the right tools and techniques, you’ll improve quickly. Think of it like learning to ride a bike: at first, balance is key, but soon it becomes second nature. Remember, safety is essential, and practice makes perfect. As you gain confidence, you’ll discover that soldering isn’t just a skill—it’s a gateway to creating and fixing electronics. Keep experimenting, and you’ll see how rewarding it can be.