To safely replace a light fixture, turn off the power at the circuit breaker and verify the wires are dead using a voltage tester. Remove the old fixture by unscrewing and disconnecting the wires, noting how they’re connected. Prepare your new fixture by ensuring compatibility and matching wires, then connect the wires securely with wire nuts, wrap with electrical tape, and attach the fixture firmly. Restoring power and testing completes the process — your next steps are easier than you think.
Key Takeaways
- Turn off power at the circuit breaker and verify the circuit is de-energized before starting.
- Remove the existing fixture carefully, noting wiring connections for reference.
- Verify compatibility and prepare the new fixture, matching wiring colors and following manufacturer instructions.
- Connect the new fixture’s wires securely with wire nuts and electrical tape, then mount it firmly.
- Restore power, turn on the switch, and test the fixture to ensure proper operation.
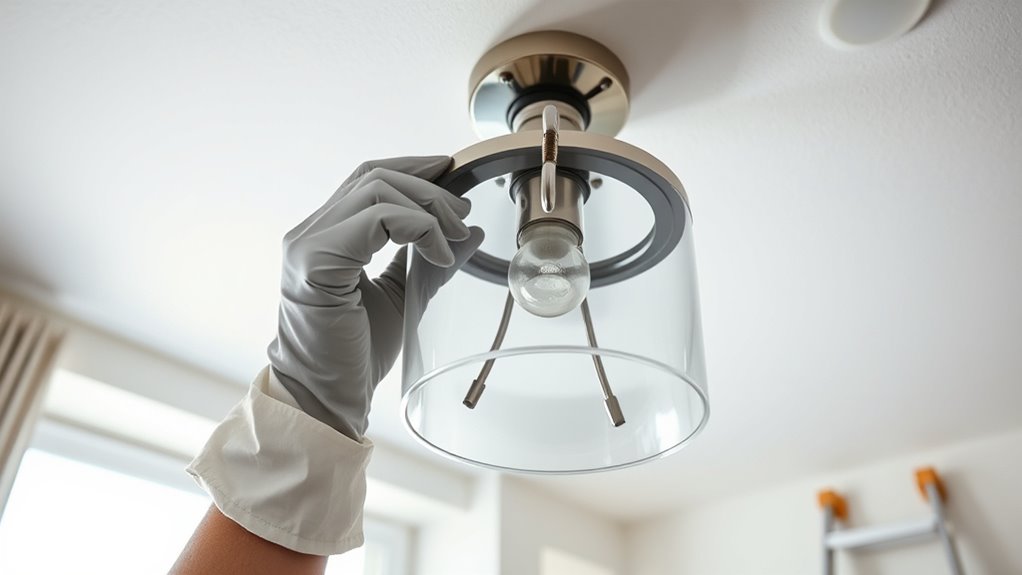
Replacing a light fixture is a straightforward task that you can accomplish with basic tools and some careful planning. Before you start, turn off the power at the circuit breaker to guarantee wiring safety. Double-check that the circuit is dead by flipping the switch and testing the fixture with a voltage tester. This step is essential to prevent electrical shocks. Once you’re confident the power is off, remove the existing fixture by unscrewing the mounting screws and gently pulling the fixture away from the ceiling or wall. Take note of how the wires are connected, as this will help when installing the new fixture.
Always turn off power and test with a voltage tester before removing a fixture.
When choosing your new fixture, it’s important to verify fixture compatibility. Ensure it fits the existing mounting bracket or that you have the appropriate hardware to install it securely. Check the weight of the fixture; heavier fixtures may require additional support or a different mounting method. Also, confirm that the fixture is rated for your ceiling type and that the wiring connections match the existing wiring configuration. Some fixtures come with detailed instructions, but always compare the wiring colors and configurations with your existing setup to avoid mismatched connections.
Next, prepare your wiring. Carefully strip about half an inch of insulation from each wire if needed, using wire strippers. Connect the wires from the fixture to the corresponding wires in your ceiling or wall. Typically, the black or red wire is hot, the white wire is neutral, and the green or copper wire is ground. Make sure to twist the wires together tightly and secure them with wire nuts. For added safety, wrap electrical tape around the wire nuts. If your fixture or house wiring uses different colors, consult the manufacturer’s instructions or a wiring diagram to ensure correct connections.
Once all wiring connections are secure, tuck the wires neatly into the electrical box, and attach the fixture to the mounting bracket using the provided screws. Ensure it’s firmly in place and level. Then, install the light bulb(s) specified for the fixture, making sure they’re compatible with your fixture’s maximum wattage. Finally, restore power at the circuit breaker, turn on the switch, and test your new fixture to make sure it works properly. Remember that using the correct type of light bulb can also impact the overall brightness and energy efficiency of your new fixture.

YESWELDER 135A MIG Welder, 110V Flux Core MIG/Lift TIG/Stick 3-in-1 Large LED Digital Display Welding Machine IGBT Inverter Welder
MULTI PROCESS: Experience the convenience of a high-quality, budget-friendly 3-in-1 welding machine that masterfully handles Gasless Flux Core...
As an affiliate, we earn on qualifying purchases.
Frequently Asked Questions
Can I Replace a Light Fixture Without Turning off the Power?
No, you shouldn’t replace a light fixture without turning off the power because of electricity safety and DIY risks. Working with live wires can lead to electric shocks or fires. Always switch off the circuit breaker before starting any electrical work. This simple step safeguards you from dangerous shocks and ensures a safer DIY experience. Never skip turning off the power; safety should always come first.
What Tools Are Essential for Replacing a Light Fixture?
Imagine assembling a puzzle; the right tools are your key pieces. For replacing a light fixture safely, you need a screwdriver, pliers, wire strippers, a voltage tester, and possibly a ladder. Keep your tools well-maintained for lighting safety and ease. Always test your tools before use to prevent accidents. Having these essentials guarantees your project goes smoothly and safely, turning a challenging task into a manageable DIY success.
How Do I Identify the Correct Wattage for My New Fixture?
You identify the correct wattage for your new fixture by checking the light bulb compatibility and fixture wattage guidelines. Look for the maximum wattage label on your fixture or packaging, which indicates the highest safe wattage. Avoid exceeding this limit, as it can cause overheating. Always match your bulbs to the recommended wattage to guarantee safety and peak performance of your new light fixture.
Is It Necessary to Hire an Electrician for This Task?
While you can give it a shot, it’s wise to consider an electrician consultation for replacing a light fixture. If you’re comfortable with basic electrical work, you might manage, but safety precautions are essential—mistakes can be costly. An electrician ensures everything’s up to code and safe, especially in tricky setups. When in doubt, hiring a pro isn’t just smart; it’s a step toward peace of mind and a well-lit space.
How Do I Troubleshoot if the New Light Doesn’T Turn On?
If your new light doesn’t turn on, first check if the light bulb is compatible with your fixture. Then, turn off the power and inspect wiring connection issues—make sure all wires are securely connected and correctly matched. Sometimes, a loose connection or incompatible bulb causes the problem. If it still doesn’t work, test the fixture with a different bulb or consider consulting an electrician to guarantee safety.

VEVOR 13-Gallon Air Compressor, 2HP, 4.6 SCFM@90PSI, Oil-Free Tank, 66dB Quiet Operation, Ideal for Tire Inflation, Woodworking, Auto Repairs, and Spray Painting (Maximum Pressure 125 PSI)
Built to Last: The 13-gallon large-capacity tank paired with a 2HP motor delivers fast air buildup in under...
As an affiliate, we earn on qualifying purchases.
Conclusion
Now that you know how to replace a light fixture safely, you’re ready to brighten up your space with confidence. Remember, tackling electrical projects is like riding a bike—once you’ve learned, it’s easier each time. So, don’t shy away from future upgrades; embrace the power in your hands. After all, you’re not just changing a light bulb—you’re illuminating your home and your skills. Shine on, DIYer!

Klutch 29-Gallon Air Compressor, 2.5 HP, 120 Volts, 175 PSI
POWERFUL COMPRESSOR: Unleash the potential of your tools with this portable air compressor, the Klutch 29-Gallon Air Compressor's...
As an affiliate, we earn on qualifying purchases.

BESTMIG 145A 4-in-1 Multi-Process Welder, 110V/220V MIG/TIG/MMA/Stick Welding Machine, Gas & Gasless Flux Core Welder with Synergy IGBT Inverter, Includes Welding Helmet & Gloves
【4-in-1 Multifunctionality & Superior Welding Performance】The BESTMIG MIG145 supports dual voltage of 110/220V and combines Gas/Gasless MIG,Stick and...
As an affiliate, we earn on qualifying purchases.