Start by gathering your measuring tools, like a tape measure and level, to mark precise locations for studs and headers. Use a saw to cut lumber to the right length, then assemble the bottom and top plates, attaching the studs at the marked spots. Keep checking for level and plumb to make certain a straight wall. Reinforce joints with brackets or hurricane ties for added strength. If you want to learn more about each step, keep going.
Key Takeaways
- Begin with measuring, marking, and leveling the layout to ensure accurate placement of studs and headers.
- Use a circular or miter saw to cut the top and bottom plates and studs to precise lengths.
- Assemble the bottom and top plates first, attaching studs at marked intervals with a nail gun or hammer.
- Install framing, ensuring walls are plumb and level, reinforcing joints with brackets or hurricane ties.
- Finish by adding blocking, supports, and moisture-resistant fasteners for long-term stability.

Framing a basement wall requires careful planning and the right sequence of tools to guarantee a strong, straight structure. Before you start, you need to focus on hardware selection—choosing the right nails, screws, anchors, and brackets is essential for stability and durability. Opt for corrosion-resistant fasteners suitable for basement environments, especially if moisture is a concern. Having the proper hardware ensures your frame stays secure over time, preventing future issues like warping or loosening.
Safety precautions are critical throughout this process. Always wear protective gear such as gloves, safety glasses, and a dust mask when cutting or handling materials. Make sure your workspace is clear of obstructions, and use proper lifting techniques to avoid injury when moving heavy lumber or equipment. Keep tools in good working order, and double-check that power cords and safety guards are in place before operating any machinery. Staying alert and adhering to safety standards minimizes accidents and keeps your project on track.
Prioritize safety with protective gear, clear workspace, proper lifting, and equipment checks to ensure a secure, accident-free basement framing project.
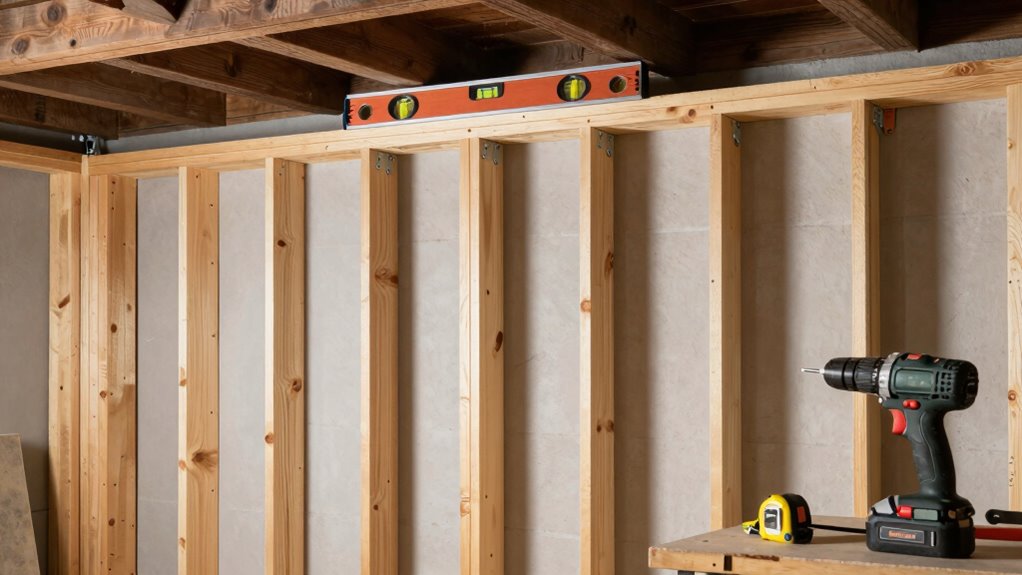
The sequence of tools begins with measuring and marking. Use a tape measure and a level to establish your wall’s layout, marking precise locations for studs and headers on the basement floor and ceiling. Once your marks are in place, the next step is cutting the lumber. A circular saw or a miter saw will give you clean, straight cuts—ensure you’re using the correct blade for the material to avoid splintering. During cutting, keep safety precautions in mind: always wear eye protection, and handle blades with care.
After cutting, you’ll move on to framing. Start by assembling the bottom and top plates, attaching studs at marked intervals with a nail gun or hammer and nails. When fastening, ensure hardware selection is appropriate—using the right nails or screws for the framing helps prevent future problems like loosening or shifting. Use a level frequently to check that your wall remains plumb and straight as you go along. A framing square can help confirm right angles, especially at corners. Proper hardware selection is crucial to ensure your structure remains stable and durable over time.
Once the frame is up, reinforce joints with metal brackets or hurricane ties if needed, again paying attention to hardware selection for maximum strength. Additionally, understanding the importance of structural integrity can help guide proper fastening techniques and reinforce the overall stability of your project. Incorporating moisture-resistant materials and fasteners can significantly extend the lifespan of your basement wall, especially in damp environments. Finish up by installing any necessary blocking or additional supports, always keeping safety precautions in mind. Throughout the process, maintain a clean workspace, double-check your measurements, and stay vigilant about safety. Following this sequence and prioritizing hardware selection and safety will help you build a basement wall that’s not only sturdy but also long-lasting. Additionally, understanding the importance of biodiversity and sustainable practices can inform eco-friendly choices in your renovation materials and methods.

KJE 2-Piece 3 in 1 Framing Tool, 12" 14" 16" On-Center Stud Spacer Framing Tool, Cast Aluminum Stud Layout Jig for Walls, Roofs, Floors, Ladders – Altitude Craft Tool
1. 【3-in-1 Framing Tool for Perfect Spacing】Achieve instant and precise 12", 14", and 16" on-center stud layout with…
As an affiliate, we earn on qualifying purchases.
As an affiliate, we earn on qualifying purchases.
Frequently Asked Questions
What Safety Precautions Should I Take During Basement Framing?
You should prioritize safety during basement framing by wearing personal protective gear like gloves, goggles, and a dust mask to protect yourself from debris and dust. Always follow tool safety guidelines, ensuring tools are in good condition and used correctly. Keep your workspace tidy to prevent trips and falls, and be cautious when handling heavy lumber. Taking these precautions helps prevent injuries and keeps your project running smoothly.
How Do I Handle Uneven or Sloped Basement Floors?
You face uneven or sloped basement floors, but don’t worry—you can master floor leveling and slope correction. Start by measuring the slope precisely, then decide whether to use shims, leveling compounds, or a mudsill adjustment. Carefully install these to create a flat, stable surface for framing. With patience and attention to detail, you’ll *guarantee* your basement walls are perfectly aligned, transforming a tricky space into a solid foundation.
Can I Frame a Basement Wall Without a Helper?
Yes, you can frame a basement wall alone using DIY techniques. Start by gathering tool recommendations like a cordless drill, level, hammer, and a framing square. Use braces or temporary supports to hold the wall studs in place while you secure them. Carefully measure and mark the wall layout, then piece everything together step-by-step. Patience and proper planning are key to successfully framing a basement wall solo.
What Are Common Mistakes to Avoid When Framing?
When framing, avoid common mistakes like neglecting to install proper wall insulation and moisture barriers. Make sure your studs are level and evenly spaced to prevent structural issues. Don’t forget to add vapor barriers to prevent moisture problems, especially in basements. Measure carefully before cutting and double-check your layout. Rushing can lead to framing errors, so take your time to ensure everything is aligned, secure, and properly insulated for long-lasting results.
How Do I Ensure the Wall Studs Are Level and Plumb?
You tighten your grip on the level, feeling the tension build as you check each stud. To guarantee they’re level and plumb, start with accurate stud alignment, then use leveling techniques like a bubble or laser level. Double-check each one from multiple angles, adjusting as needed. When all studs sit perfectly aligned, you’ll see your wall take shape—solid, straight, and ready to stand the test of time.

Fas-N-Tite Phosphate-Coated Framing Screw (#7 x 7/16")
Sharp self-tapping point and fine threads easily penetrate metal surfaces; eliminates need for pilot holes; speeds up installation…
As an affiliate, we earn on qualifying purchases.
As an affiliate, we earn on qualifying purchases.
Conclusion
Mastering the right tool sequence makes framing your basement wall smoother and more efficient. Did you know that proper planning and tool use can reduce framing time by up to 30%? By following the correct order, you guarantee accuracy and safety throughout your project. So, stay organized, use the right tools at each step, and you’ll be surprised how quickly you can transform your basement. Happy framing!

IKOVWUK Laser Level, 3×360° Cross Line Laser for Construction and Picture Hanging, 12 Green Lasers with Self-leveling, 3D Vertical & Horizontal Line, Level Tool with 5200 mAh Rechargeable Battery
3 X 360° Lasers Full Layout: 1×360° horizontal and 2×360° vertical, which can cover all around the room;…
As an affiliate, we earn on qualifying purchases.
As an affiliate, we earn on qualifying purchases.

SKIL 15 Amp 7-1/4 Inch Circular Saw with Single Beam Laser Guide – 5280-01
Powerful 15-amp motor delivers 5 300-RPM for greater speed and faster cuts
As an affiliate, we earn on qualifying purchases.
As an affiliate, we earn on qualifying purchases.