During cold winter weekends, you can create a cozy home with simple DIY projects like making plush throw pillows, decorating mason jar lanterns, or building a rustic wooden photo display. You might also craft scented candles, knit warm scarves, or set up an indoor herb garden for fresh flavors. Upcycling old furniture can add a personal touch, while personalized mugs or cozy blankets bring extra comfort. Keep exploring to discover more ways to make your space snug and inviting.
Key Takeaways
- Create warm, textured throw pillows and rustic photo displays to add cozy charm to your home decor.
- Make scented candles and decorate mason jar lanterns for inviting indoor lighting and ambiance.
- Set up an indoor herb garden using suitable containers to enjoy fresh herbs year-round.
- Upcycle old furniture with paint and simple assembly projects like pallet coffee tables for functional decor.
- Personalize your space with DIY accessories like custom winter wear or decorative accents for a warm, inviting atmosphere.
Crafting Warm and Cozy Throw Pillows
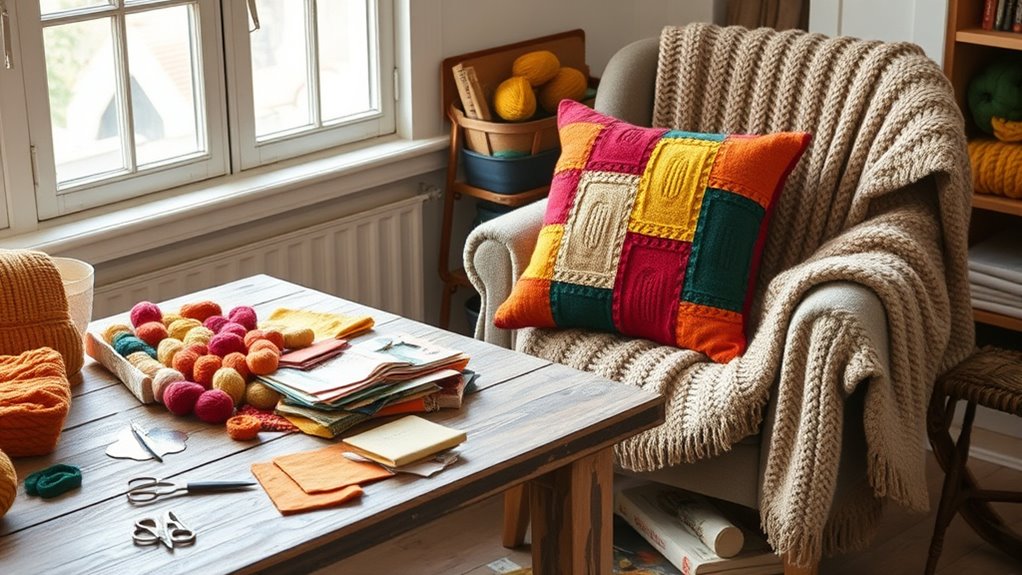
When winter’s chill sets in, creating your own warm and cozy throw pillows is a perfect way to add comfort and personality to your living space. Focus on texture and fabric choices to make your pillows inviting—think plush velvet, soft chenille, or chunky knit covers. These textures instantly add warmth and visual interest. Pillow decorating ideas include mixing patterns, like floral with geometric, or layering different fabrics for a curated look. Consider using bright colors or winter-inspired hues such as deep reds, forest greens, or icy blues to reflect the season’s vibe. Adding decorative elements like tassels, embroidery, or button accents can elevate your designs. With a little creativity, your handmade pillows will become cozy focal points that make your home more inviting during the cold months. Incorporating safe and reliable materials ensures your DIY projects are durable and long-lasting through the winter season. Additionally, choosing durable fabrics that can withstand frequent use and washing will help maintain your pillows’ appearance and comfort over time. Selecting appropriate filling materials also contributes to the longevity and comfort of your pillows, ensuring they stay plush and supportive during frequent use. Using hypoallergenic options can also help create a healthier environment, especially during the winter when indoor air quality may be lower. To achieve the best results, consider researching cleaning and maintenance tips specific to your chosen fabrics and fillings to keep your pillows looking fresh and comfortable.
Making Scented Candles to Enhance Your Space

When making scented candles, choosing the right fragrance blends can create the perfect cozy atmosphere. It’s also important to follow safety tips to prevent accidents and guarantee your project is enjoyable. Keep these points in mind as you craft beautiful, fragrant candles for your space.
Choosing Fragrance Blends
Choosing the right fragrance blends is essential for creating scented candles that truly enhance your space. Start with fragrance layering by combining complementary scents that evoke warmth and comfort, like vanilla and cinnamon or cedarwood and citrus. Use essential oil blends to add depth and personalization, selecting aromas that match your mood or season. Experiment with different ratios to achieve a balanced scent that isn’t overpowering but fills the room gently. Remember, the goal is harmony—pair fresh, spicy, or woody notes to create a cozy atmosphere. Keep notes of your favorite combinations so you can recreate them later. Carefully blending fragrances guarantees your candles deliver a delightful aroma, transforming your space into a warm, inviting retreat during cold winter weekends. Additionally, understanding Free Floating techniques can help you create a more natural and seamless scent experience. Incorporating scent layering strategies can further enhance the depth and complexity of your candle aromas, resulting in a more immersive sensory experience. Exploring fragrance profiles can also help you choose scents that complement each other and enhance your overall ambiance.
Candle-Making Safety Tips
Creating scented candles can instantly warm up your home, but safety should always come first. When candle-making, prioritize candle safety by never leaving melting wax unattended and keeping a fire extinguisher nearby. Proper wax handling is essential; always use heat-resistant containers and avoid overfilling to prevent spills. Use a thermometer to monitor wax temperature, preventing overheating that could cause fires. Keep your workspace clear of flammable materials, and handle hot wax with care, using tools like tongs or gloves. Ensure your wick is centered and secured to prevent uneven burning. Regularly inspecting your equipment, such as your filter and pump protection, can help maintain a safe and efficient workspace. Practicing candle safety and careful wax handling will help you create beautiful, safe candles that enhance your space without risking accidents.
Creating a Rustic Wooden Photo Display
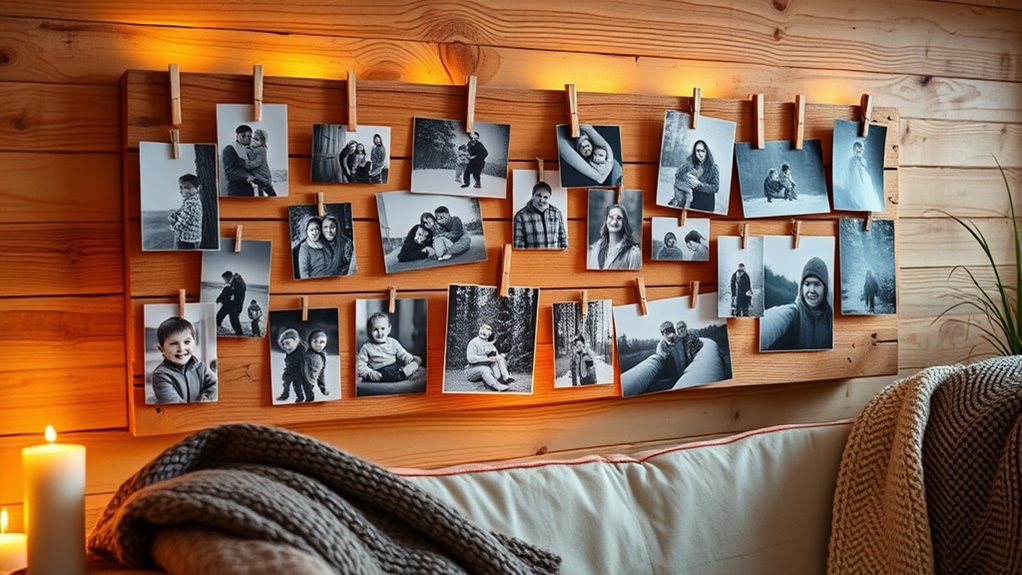
Start by choosing the right type of wood that matches your rustic style and is sturdy enough to hold your photos. Next, plan your frame layout to display your images attractively and cohesively. To add a unique touch, consider incorporating personalized elements that reflect your style and personality. Including proper finishing techniques can enhance the durability and appearance of your display. Additionally, selecting quality materials ensures your project remains beautiful and durable over time. Finally, attach your photos securely using nails or adhesive, ensuring they stay in place and look great. Incorporating visual cues can also help you arrange your display more effectively.
Selecting the Perfect Wood
When selecting wood for your rustic photo display, it’s important to take into account both the look and durability of the material. The wood grain plays a big role in achieving that authentic rustic charm, so choose boards with prominent, natural patterns. Opt for hardwoods like oak or cedar, known for their timber durability, ensuring your display withstands regular use and handling. If you prefer a softer look, pine can work well, but it’s less resilient. Consider reclaimed wood for added character and sustainability, as it often features unique grain patterns and a weathered appearance. Additionally, understanding grain patterns and material properties can help you select the best wood for your project. Being aware of color temperature adjustments can also optimize the appearance of your display under different lighting conditions. Incorporating proper sealing and finishing will help protect your wood from moisture and wear over time, ensuring your display remains beautiful longer. Be mindful of adhesive strips when assembling your display to ensure easy and damage-free installation. Ultimately, balancing aesthetic appeal with durability will help you create a stunning, long-lasting display that enhances your winter decor.
Designing the Frame Layout
Designing the frame layout is the essential step that determines how your rustic photo display will look and function. Your layout planning sets the tone, balancing aesthetic appeal and practicality. To create an eye-catching arrangement, consider these key steps:
- Visualize the overall look, whether symmetrical or eclectic, to evoke warmth and charm. Incorporating aesthetic principles can help guide your design choices for a harmonious display. Additionally, paying attention to design symmetry can enhance visual balance and appeal.
- Experiment with different frame arrangements on the floor before hanging, ensuring spacing and alignment feel right.
- Use a variety of sizes and orientations to add visual interest and highlight your favorite moments.
- Incorporate sleep hygiene principles by choosing calming colors and materials that promote a cozy, restful atmosphere. Selecting materials with good ventilation can also help maintain the integrity of your display over time.
Attaching Photos Securely
Once you’ve planned your layout, securing your photos firmly is key to creating a stable and attractive rustic wooden display. To do this, use reliable methods for photo hanging, such as small hooks, clips, or adhesive strips that won’t damage the wood. When wall mounting, ensure your nails or screws are driven into studs or use appropriate wall anchors for added stability. Position each photo carefully, making sure they’re level and spaced evenly. For added security, consider using picture wire or thin cords stretched across the back of your frame, allowing you to hang multiple photos easily and adjust their positions. This approach keeps your display neat and prevents photos from slipping or falling, ensuring your rustic wooden photo display remains beautiful and secure over time. Additionally, choosing Vetted hanging accessories helps guarantee durability and safety for your project. To further enhance the display’s stability, consider using quality hardware that is designed for outdoor or rustic settings, which provides extra peace of mind. Incorporating proper weight distribution ensures that the load is evenly spread, reducing strain on individual hooks or fasteners.
Designing Personalized Mug Sets

Creating personalized mug sets is a fun and rewarding winter indoor project that allows you to showcase your creativity. With personalized mug designs, you turn simple cups into meaningful keepsakes. To start, pick a theme that resonates with you—whether it’s favorite quotes, artwork, or family photos. Next, try these creative mug decorating ideas:
Create personalized mug sets this winter to transform simple cups into meaningful keepsakes and showcase your creativity.
- Use ceramic markers to draw intricate patterns or heartfelt messages.
- Apply stencils for precise designs that match your style.
- Add personal touches like hand-painted illustrations or monograms.
These steps not only make your mugs unique but also evoke warm feelings every time you sip your hot cocoa. Designing personalized mug sets is a perfect way to enjoy the cozy spirit of winter while creating cherished keepsakes.
Knitting or Crocheting Soft Blankets and Scarves
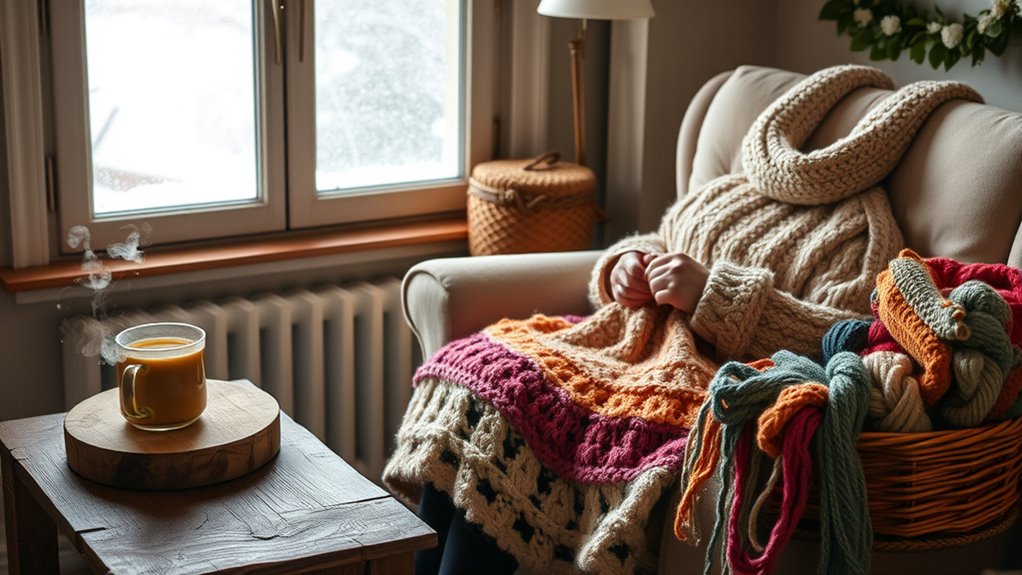
During cold winter days, knitting or crocheting soft blankets and scarves is an enjoyable way to stay warm and add a personal touch to your home. Exploring different knitting techniques, like cable or seed stitch, helps create cozy textures perfect for winter accessories. When crocheting, experimenting with various crochet patterns, such as granny squares or simple rows, allows you to craft stylish, warm pieces. These projects are easy to customize with your favorite colors and yarn types, making them truly unique. Plus, the repetitive nature of knitting and crocheting offers a relaxing, meditative experience. Whether you’re a beginner or experienced, working on blankets or scarves provides tangible results that keep you warm and proud of your handmade creations.
Building a Wooden Pallet Coffee Table
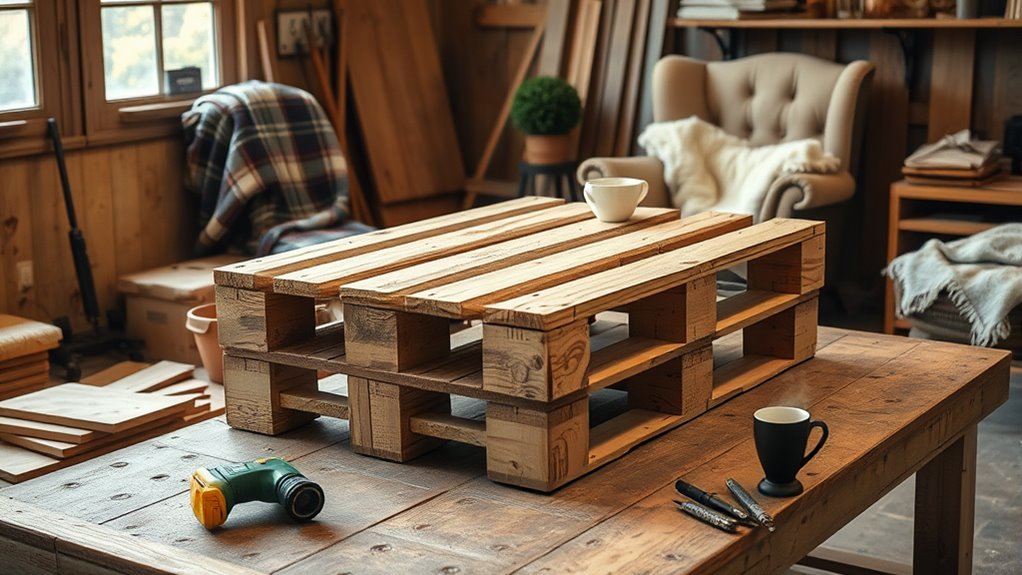
Start by choosing pallets that are sturdy and free of damage, ensuring they’ll hold up well as a table. Use safe disassembly techniques to avoid injury and keep your materials intact. Once you have your pieces, focus on assembling and finishing your table for a polished, durable look.
Selecting the Right Pallets
Choosing the right pallets is essential to guarantee your wooden pallet coffee table is sturdy, safe, and visually appealing. First, inspect for pallet staining, ensuring the wood is free of chemicals or mold that could harm your indoor space. Second, check the pallet storage; select pallets that haven’t been exposed to excessive moisture or pests, which can compromise their integrity. Third, confirm the pallets are in good condition—no loose or broken boards—so your table remains durable. By carefully selecting pallets, you’ll create a beautiful piece that’s both functional and charming. Remember, the right pallets make all the difference in achieving a polished look and a lasting project. With these tips, your DIY coffee table will be a cozy centerpiece for winter.
Safe Disassembly Techniques
Disassembling pallets safely is essential to prevent injuries and preserve the wood for your coffee table project. Start by choosing the right tools—pry bars, hammer, and gloves—to guarantee safe disassembly. Always wear eye protection and work on a stable surface. Use proper technique: gently pry apart boards without forcing, to avoid splinters or broken wood. Remember, tool selection impacts disassembly safety—select tools suited for pallet nails and wood. Keep a clear workspace and work slowly, checking each piece for damage before reuse. Here’s a quick guide on tool choices and safety tips:
| Tool | Safety Tip |
|---|---|
| Pry Bar | Apply steady pressure, avoid slips |
| Hammer | Keep fingers clear of strikes |
| Gloves | Protect hands from splinters |
| Safety Glasses | Shield eyes from debris |
| Work Surface | Ensure stability before working |
Assembling and Finishing
Once you have your pallet pieces ready, assembling your coffee table involves measuring, aligning, and securely fastening each part. This step is exciting because it transforms raw materials into a functional piece of seasonal decor. To guarantee a sturdy build, follow these key steps:
- Double-check measurements to keep everything level and balanced.
- Use screws or nails to firmly secure the top and sides.
- Sand rough edges for a smooth finish, making it safe and inviting.
Finishing touches make your table special—consider staining or painting to match your winter decor. Not only does this create a cozy aesthetic, but it also provides clever storage solutions beneath the surface for blankets, magazines, or holiday supplies. Your handmade table will be both beautiful and practical for those chilly weekends.
Painting and Decorating Mason Jar Lanterns

Have you ever thought about transforming plain mason jars into charming lanterns that brighten up your winter indoors? Mason jar painting is a simple way to add color and personality to your lantern decorating. Start by choosing your favorite winter hues or metallic accents, then use acrylic paint to create designs or patterns. You can also experiment with stencils or freehand techniques for unique effects. Once the paint dries, consider adding a layer of clear sealant for durability. For an added touch, insert battery-operated candles or fairy lights inside to create a cozy glow. This project allows you to express your style while making functional, beautiful decor. With some creativity and a few supplies, your mason jar lanterns will become a warm, inviting feature in your home.
Sewing Custom Winter Wear Accessories

Why not craft your own cozy winter accessories to stay warm and add a personal touch to your wardrobe? Winter sewing is the perfect way to create unique pieces that reflect your style. By customizing accessories, you can enjoy these benefits:
- Feel the satisfaction of making something with your own hands, adding warmth and personality.
- Design items like scarves, hats, or mittens that fit perfectly and match your favorite winter outfits.
- Save money while enjoying the creative process of accessory customization.
Sewing custom winter wear accessories not only keeps you cozy but also transforms your winter wardrobe into a reflection of your personality. Plus, it’s a fun indoor activity that keeps you productive during cold weekends.
Arranging a Lovely Indoor Herb Garden

Creating an indoor herb garden is a rewarding way to bring fresh flavors into your kitchen year-round. Start by choosing containers with good drainage; terracotta or ceramic pots work well for indoor herb care. Select containers that fit your space and allow enough room for roots to grow. When arranging your herbs, place taller varieties like basil or cilantro at the back and smaller ones like thyme or chives at the front for easy access. Use quality soil and guarantee your herbs receive ample light—near a south-facing window is ideal. Regular watering and occasional fertilizing keep your herbs thriving. Here’s a quick guide to container selection:
| Container Type | Benefits |
|---|---|
| Terracotta | Breathable, prevents overwatering |
| Ceramic | Attractive, retains moisture |
Upcycling Old Furniture With a Fresh Coat of Paint
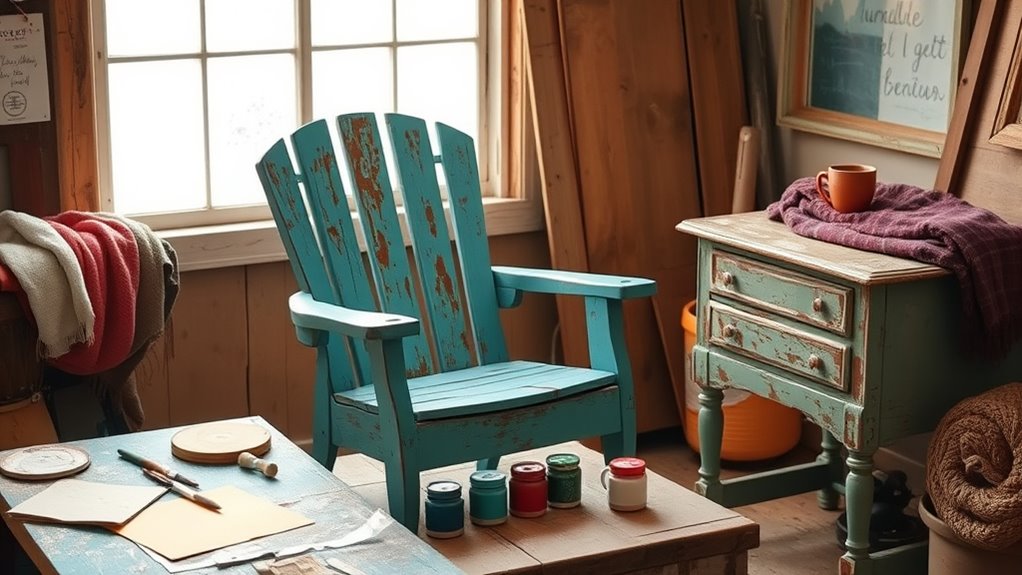
Revitalizing old furniture with a fresh coat of paint is an easy way to breathe new life into your space and showcase your creativity. Start by sanding the furniture to smooth out imperfections and prepare the surface for paint. Next, carefully choose a paint color that complements your decor and reflects your style—this step is key to transforming the piece. As you work, think about:
Revamp your furniture with paint; personalize your space and add charm to your home.
- How the new color can brighten or warm your room’s atmosphere
- The satisfaction of giving a second life to something old
- The joy of customizing your space with a unique, handmade touch
With these simple steps, your furniture will become a stunning statement piece, adding character and charm to your home during those cozy winter weekends.
Frequently Asked Questions
What Are Some Budget-Friendly Materials for These DIY Projects?
You can find budget-friendly materials for your DIY projects by recycling craft supplies like old jars, fabric scraps, and cardboard. These items help you create affordable home decor without spending much. Look around your home for everyday items you can repurpose, and visit thrift stores for inexpensive materials. Using recycled supplies not only saves money but also makes your projects eco-friendly and unique.
How Can I Ensure Safety When Using Hot Glue and Sharp Tools?
To guarantee hot glue safety, always work on a stable surface and keep your fingers clear of the hot glue gun tip. For sharp tool precautions, wear protective gloves and handle blades carefully, cutting away from your body. Keep tools out of children’s reach and store them properly after use. By staying attentive and cautious, you prevent accidents and enjoy your DIY projects safely and confidently.
Are There Eco-Friendly Alternatives for Crafting Supplies?
You can explore sustainable crafting by choosing biodegradable supplies like bamboo, recycled paper, or natural fibers. Look for eco-friendly adhesives and paints made from non-toxic, biodegradable ingredients. Opt for reusable tools and upcycle materials whenever possible. This way, you reduce waste and minimize your environmental impact while enjoying your DIY projects. Sustainable crafting not only helps the planet but also makes your creations uniquely eco-conscious and beautiful.
How Long Do Handmade Candles and Lanterns Typically Last?
Handmade candles usually burn for about 20 to 40 hours, depending on their size and wax type. Lantern longevity varies based on the materials used; a well-crafted paper lantern might last several weeks with careful handling, while wooden or metal ones can endure for years. To maximize candle burning duration and lantern lifespan, store them properly, keep them away from moisture, and avoid drafts.
Can These Projects Be Adapted for Kids or Family Activities?
You can easily adapt these projects for family involvement by making them kid-friendly. Did you know that involving kids in DIY activities boosts their creativity and confidence? To keep it safe, choose simple, non-toxic materials and supervise closely. You can turn candle or lantern projects into fun family activities, encouraging teamwork and shared achievement. With a few tweaks, these cozy projects become perfect for creating lasting memories together.
Conclusion
Spending weekends cozying up with DIY projects not only warms your space but also boosts your mood. Did you know that engaging in creative activities can reduce stress by up to 25%? So, embrace these ideas to make your home more inviting and enjoy the comfort of your handmade touches. With just a little effort, you’ll create a winter haven that feels truly yours—perfect for relaxing and making lasting memories.