To create a simple woodworking Thanksgiving centerpiece, start by gathering basic materials like wooden planks, seasonal foliage, and decorative accents. Plan your design with measurements to guarantee it fits your table and matches your style. Cut and sand your wood pieces, then assemble the base with glue or nails for stability. Add your favorite seasonal decorations, finish with a sealant, and arrange it beautifully on your table. If you keep going, you’ll discover detailed steps to make it truly special.
Key Takeaways
- Gather seasonal natural materials, wooden components, and decorative accents, then plan and sketch your centerpiece design.
- Cut and sand wooden pieces to desired dimensions, then assemble for a sturdy foundation.
- Decorate with seasonal foliage, small gourds, and personalized engravings for visual appeal.
- Arrange floral elements and accents evenly to create balance and harmony with your table theme.
- Ensure stability, safety, and proper placement, incorporating candles and decor for an inviting holiday atmosphere.

Cinrobiye 24 Set Thanksgiving Turkey Craft Kits DIY Thankful Turkey Flower Pot Making Kit Decorative Turkey Pots Art for School Classroom Activities Home Decoration Festival Gifts Party Favor Supplies
- Complete Craft Kit: Includes 24 flowerpots and accessories
- Easy Assembly: Simple steps for quick creation
- Festive Design: Colorful turkey cards and pom-poms
As an affiliate, we earn on qualifying purchases.
As an affiliate, we earn on qualifying purchases.
Gathering Materials and Tools

Before you begin creating your centerpiece, it’s important to gather all the necessary materials and tools. Start by collecting seasonal foliage such as colorful leaves, pinecones, and small branches to add natural charm. Make sure you have sturdy candle holders in various heights to create visual interest and warmth. You’ll also need a clean workspace, scissors, floral wire or hot glue, and optional decorative accents like miniature gourds or berries. Having a variety of foliage will give your arrangement texture and depth. Check your supplies before starting to avoid interruptions. With everything ready, you’ll be set to craft a stunning, personalized Thanksgiving centerpiece that highlights seasonal beauty and creates a cozy atmosphere for your celebration.

JUNEBRUSHS 60 Pieces Fall Artificial Maple Leaave House Decoration Crafts
- Color Variety: Six autumn colors, 10 pieces each
- Multiple Sizes: Three sizes for versatile use
- Hand-Woven Craftsmanship: Unique, durable, and realistic leaves
As an affiliate, we earn on qualifying purchases.
As an affiliate, we earn on qualifying purchases.
Planning Your Design and Dimensions
To create a cohesive and visually appealing centerpiece, start by planning your design and determining the dimensions that will fit your table and complement your decor. Consider your chosen seasonal color schemes—think warm oranges, deep reds, or rustic browns—to guide your color choices in accents or painted details. Measure your table’s surface to guarantee your centerpiece isn’t too large or small. Keep safety precautions in mind: avoid overly sharp edges or unstable bases that could tip or cause injury. Sketch your design to visualize the arrangement and size of each element, ensuring balance and harmony. Being mindful of product safety is essential when selecting materials and finishes, ensuring your project is both beautiful and safe for holiday gatherings. Additionally, incorporating outdoor elements like natural materials or rustic accents can enhance the overall aesthetic and make the centerpiece more harmonious with the season. Considering design proportions helps achieve a balanced and attractive look in your arrangement. Paying attention to material selection can also improve the durability and safety of your project, especially for outdoor or high-traffic use. Understanding seasonal themes can further inspire your choices and elevate your holiday decor. By thoughtfully planning your design and dimensions, you set a solid foundation for a beautiful, safe, and festive Thanksgiving centerpiece.

BANOMII Farmhouse Wooden Candle Holders for Pillar Candles Set of 3, Rustic Wood Candle Holder Table Centerpiece Decor, 12'' 9'' 6'' Vintage Tall Candle Stand Decorative, Brown
- Vintage Rustic Design: Elegant wood candle holders for various decors
- Handcrafted Quality: Made from natural, treated wood with beautiful grain
- Set of 3 Sizes: Includes 12'', 9'', and 6'' tall holders
As an affiliate, we earn on qualifying purchases.
As an affiliate, we earn on qualifying purchases.
Cutting and Preparing the Wooden Pieces

Start by selecting the wooden pieces you’ll need for your centerpiece, such as planks, blocks, or decorative shapes. Use a saw to carefully cut each piece to your desired dimensions, following your design plan. Once cut, smooth rough edges with sanding techniques like using medium-grit sandpaper initially, then fine-grit for a polished finish. Sand evenly to remove splinters and prepare surfaces for staining. After sanding, wipe down the pieces to remove dust and debris. If you want to add color, apply wood staining now, using a brush or cloth for even coverage. Allow the stain to dry thoroughly before proceeding to assembly. Proper cutting and preparation make sure your woodworking project looks professional and is safe to handle during assembly. Energy-efficient tools can also help make your project more sustainable and environmentally friendly.

SHJADE Hot Glue Gun with 30 Glue Sticks, 20W Mini Hot Melt Gun Kit(White)
- Fast Heating: Heats in 1-3 minutes for quick use
- Compatible Glue Sticks: Fits φ0.27inch (7mm) sticks
- Safe & Easy Operation: Lightweight, ergonomic handle, fold-up stand
As an affiliate, we earn on qualifying purchases.
As an affiliate, we earn on qualifying purchases.
Assembling the Base and Structure
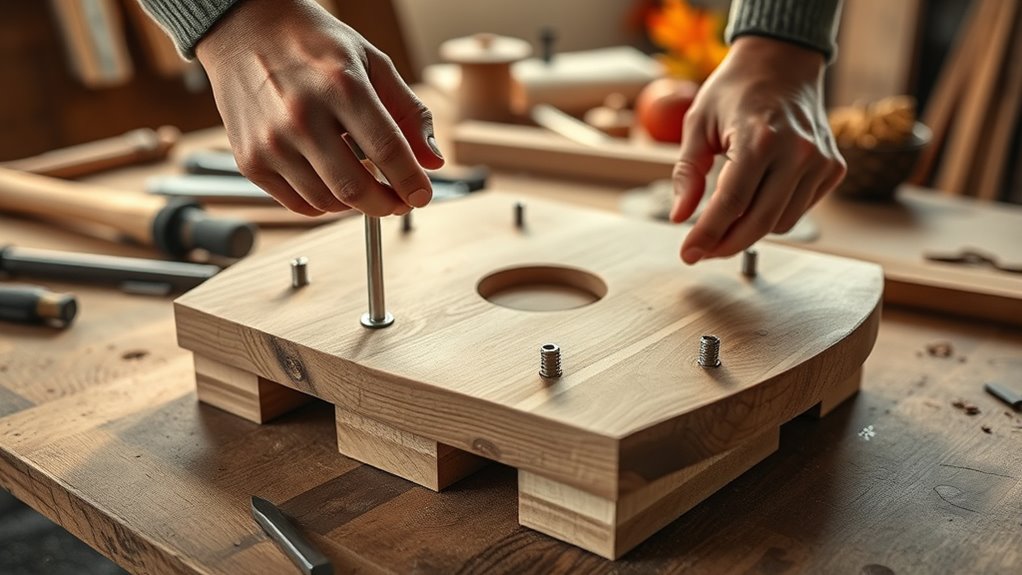
With your wooden pieces cut and sanded, it’s time to assemble the base and structure of your centerpiece. Start by attaching the main support pieces, ensuring they form a sturdy foundation. Use wood glue and clamps for a strong bond, then reinforce with nails or screws if needed. As you assemble, consider incorporating vintage accents, like distressed finishes or antique-style hardware, to add character. Think about your chosen color schemes—neutral tones or warm autumn hues—and plan how the structure will complement these. Keep your design simple yet cohesive, ensuring the centerpiece will be stable and visually appealing. Once assembled, double-check all joints for stability, and lightly sand any rough edges. Additionally, paying attention to contrast ratio can help you choose finishes and lighting that enhance the visual appeal of your centerpiece. Understanding design harmony principles can also guide you in creating a balanced and attractive arrangement. For an extra touch, experimenting with different woodgrain textures can add depth and interest to your design. Incorporating proper wood grain alignment during assembly can improve both the strength and aesthetic flow of your project. Being mindful of structural stability during assembly ensures your centerpiece remains durable over time. This step sets the foundation for the decorative elements to come.
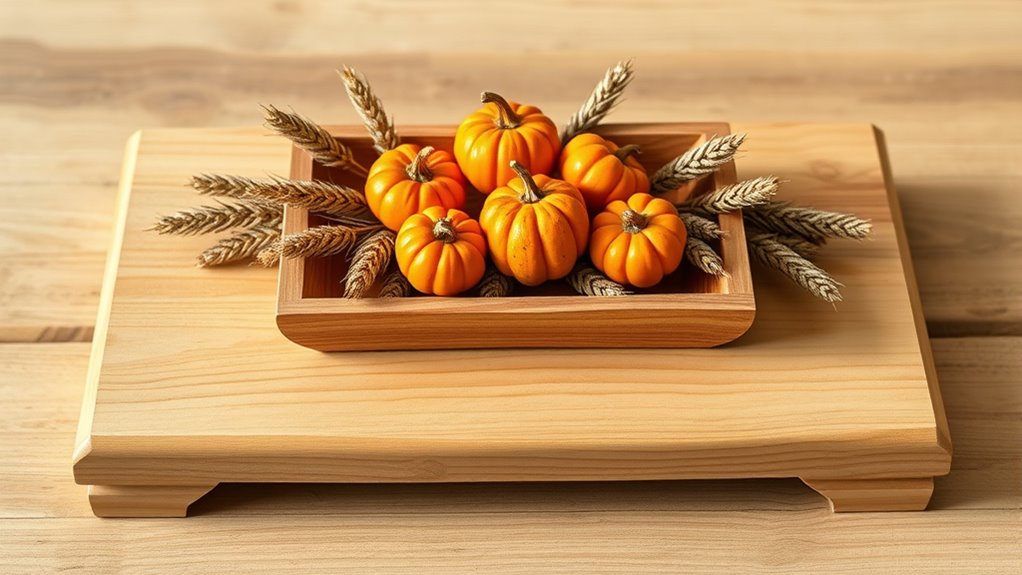
Adding Decorative Elements and Customization

Once your base and structure are securely assembled, you can begin adding decorative elements to personalize your centerpiece. Incorporate flower accents by arranging seasonal blooms like dahlias or chrysanthemums around the wood. You can also carve personalized engravings into the wood surface to add a meaningful touch. To help visualize your options, consider this table:
| Decorative Element | Placement Ideas | Tips |
|---|---|---|
| Flower accents | Centerpiece corners or middle | Use fall colors for vibrancy |
| Personalized engravings | On side panels or top surface | Use stencils for precision |
| Natural elements | Pinecones, acorns, or leaves | Mix textures for depth |
| Small gourds or pumpkins | Along edges or base | Add seasonal charm |
Mix and match these elements to craft a unique, festive display. Additionally, understanding UST projector rankings can inspire creative lighting or display techniques that complement your decorative choices, making your centerpiece even more festive. Exploring artistic traditions can also help you select meaningful motifs that resonate with the holiday spirit. Incorporating pinball design elements can add a playful touch, especially if you want to incorporate a fun or nostalgic theme into your decor.
Finishing Touches and Sealing the Wood

After adding decorative elements like flowers, engravings, and natural accents, the final step is to give your centerpiece a polished finish and shield it from wear. Start by applying a wood stain if you want to enhance the wood’s color and bring out its natural grain. Use a clean cloth or brush to evenly spread the stain, and wipe away any excess. Once the stain dries, finish with a protective finish such as a clear polyurethane or matte sealant. This layer safeguards the wood from moisture, scratches, and daily use. Be sure to follow the manufacturer’s instructions for drying times. Proper sealing techniques are essential for ensuring your centerpiece remains durable over time. A well-applied protective finish ensures your centerpiece stays beautiful throughout the holiday season and beyond.
Arranging Your Centerpiece for the Perfect Table Setting

To create a beautiful and balanced table setting, start by placing your centerpiece in the center of the table, ensuring it doesn’t obstruct guests’ view or interfere with conversation. Consider your table decor and how your DIY wooden centerpiece complements it. If you’ve added floral arrangements, position them so they add height and texture without overwhelming the space. Keep in mind that smaller accents like candles or seasonal decor can enhance the overall look and create a cozy atmosphere. Distribute other decorative elements around the centerpiece to maintain symmetry and harmony. Remember, the goal is to make your table inviting and functional, so avoid clutter. With thoughtful arrangement, your centerpiece will be the star of your Thanksgiving table setting. Also, ensure your setup is safe and stable, especially if you are incorporating candles or other potentially unstable decorations. Incorporating modern kitchen technology, such as smart lighting or temperature-controlled candle holders, can further enhance safety and ambiance. Additionally, consider the size and scale of your centerpiece to ensure it fits comfortably without crowding the table. Using proper placement techniques can help achieve a balanced and aesthetically pleasing table arrangement. Being mindful of the heavy-duty equipment involved in crafting your centerpiece, such as power tools, ensures safe and efficient assembly.
Frequently Asked Questions
How Can I Customize the Centerpiece for Different Holiday Themes?
You can customize your centerpiece by swapping out holiday decorations and seasonal accents to match each celebration. For Christmas, add mini ornaments, pinecones, and fairy lights; for winter, incorporate faux snow and evergreen branches. For other holidays, choose themed colors and symbols, like hearts for Valentine’s Day or pumpkins for Halloween. This approach keeps your woodworking project versatile, ensuring your centerpiece stays festive and relevant all year round.
What Safety Precautions Should I Take During Woodworking?
Have you ever considered how vital workspace safety is while woodworking? Always wear protective gear like goggles and masks to shield your eyes and lungs from dust and debris. Keep your workspace clean and well-lit to prevent accidents. Use sharp tools carefully, and never rush through cuts. Are you taking all necessary precautions? Staying attentive and maintaining a safe environment guarantees you enjoy your woodworking project without injury.
Can I Repurpose Existing Wooden Items for This Project?
Yes, you can definitely repurpose existing wooden items like wooden pallets and vintage crates for your centerpiece. Just sand down rough edges, clean them thoroughly, and maybe give them a fresh coat of paint or stain to match your holiday decor. This approach saves money, adds rustic charm, and makes your project eco-friendly. Plus, using recycled wood gives your centerpiece a unique, handcrafted feel perfect for Thanksgiving.
How Long Does the Entire DIY Process Typically Take?
Think of this project as planting seeds for gratitude; it typically takes about 2 to 4 hours, depending on your skill level and planning. You’ll want to set realistic timing expectations and break down steps to avoid feeling overwhelmed. Effective project planning guarantees you stay on track, allowing you to enjoy the process and have your beautiful centerpiece ready for the holiday. Patience and preparation make all the difference.
What Are Eco-Friendly Options for Sealing and Finishing?
You can choose eco-friendly options like biodegradable finishes and natural sealants to finish your woodworking project. These options are safe for the environment and often made from plant-based or non-toxic ingredients. Apply them smoothly to protect your centerpiece while reducing chemical impact. Using natural sealants like beeswax or plant oils not only enhances the wood’s appearance but also guarantees your holiday decoration stays beautiful and eco-conscious.
Conclusion
With your centerpiece complete, you’ve crafted more than just decor—you’ve created a symbol of gratitude and togetherness, echoing the warmth of a harvest feast. Like a story woven into wood, your project reflects patience and creativity, turning simple materials into a memorable focal point. As Thanksgiving unfolds, let your handcrafted centerpiece stand as a reminder that beauty arises from effort and love, making every moment around the table truly special.