To set up your home weather station, gather essential tools like mounting brackets, hardware, level, and measuring tape for proper placement. Use weatherproof fittings and appropriate cables to protect your sensors and connections. Choose reliable power sources such as batteries, solar panels, or an AC adapter, and consider backup options for uninterrupted operation. Properly install sensors at recommended heights and spots, ensuring they’re secure, level, and unobstructed. If you continue, you’ll find more tips to optimize your setup.
Key Takeaways
- Use mounting brackets, poles, or wall mounts with hardware for secure sensor attachment.
- Employ a level and measuring tape to ensure accurate sensor positioning and alignment.
- Utilize weatherproof fittings and protective enclosures to safeguard electronic components from the elements.
- Connect sensors with appropriate cables and connectors, following manufacturer instructions for secure wiring.
- Mount sensors at recommended heights and locations, avoiding direct sunlight and obstructions for precise readings.

Setting up your home weather station is a straightforward process that lets you monitor local weather conditions with ease. Once you’ve unboxed your equipment and chosen the optimal location, the next step involves ensuring that all sensors are properly calibrated and that your station has a reliable power source. Sensor calibration is essential for accurate readings; many weather stations come with factory calibration, but it’s wise to verify or fine-tune sensors such as temperature, humidity, and barometric pressure. You can do this by comparing your station’s readings with those from a trusted, professionally calibrated device or local weather service. Regular calibration helps maintain data accuracy over time, especially after power outages or hardware adjustments. Additionally, understanding your station’s power needs and backup options can help ensure continuous operation during outages or adverse weather conditions.
Power supply options are another critical aspect of setup. Many stations operate on batteries, which offer portability but require periodic replacement or recharging. If your station includes a solar panel, it can supplement or even replace batteries, making your setup more sustainable and reducing maintenance. Some models feature AC adapters, providing a consistent power source ideal for permanent installations. Before installation, consider the power options available—if you opt for batteries, choose high-quality, long-lasting types to guarantee continuous operation. If your station supports multiple power sources, you can set it up to switch seamlessly between them, ensuring uninterrupted data collection regardless of weather conditions or power outages.
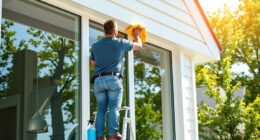
The physical installation should also be approached with care. Mount your sensors and main unit at standard heights—anemometers at about 10 meters (33 feet), temperature and humidity sensors in shaded, ventilated locations, and barometers where they won’t be affected by direct sunlight or heat sources. Secure mounting brackets firmly into sturdy structures like poles or walls, ensuring that sensors are level and unobstructed to prevent distorted readings. Use weatherproof fittings to protect electronic components from rain, snow, and dust, extending the lifespan of your station.
Once mounted, connect all cables carefully, following the manufacturer’s instructions, and double-check connections for stability. If your station includes wireless data transmission, ensure your Wi-Fi or Bluetooth connection is strong and dependable, and configure the device according to the instructions. It’s also essential to perform an initial test run—monitor the readings, verify sensor calibration, and adjust if necessary. Regular maintenance, including calibration checks and power source reviews, will keep your weather station functioning accurately and efficiently, providing you with valuable real-time data on your local weather conditions.
Frequently Asked Questions
Can I Install a Weather Station Indoors?
Yes, you can install a weather station indoors. For accurate sensor readings, place it in an indoor location with good airflow and avoid direct sunlight, drafts, or heat sources. Indoor placement guarantees you get consistent data on temperature, humidity, and air quality. Keep the sensors away from windows and appliances to maintain sensor accuracy. Proper positioning helps you monitor indoor climate effectively and make informed decisions about your home’s environment.
How Do I Connect My Weather Station to Wi-Fi?
To connect your weather station to Wi-Fi, you should first access its settings menu. Enable wireless connectivity and select your Wi-Fi network. Enter your Wi-Fi password accurately. Make sure the signal strength is strong enough; a weak signal can disrupt data transmission. Once connected, the station will sync data wirelessly. Regularly check signal strength in settings to guarantee stable, real-time updates.
What Is the Ideal Height for Mounting?
You should mount your weather station at an ideal height of about 5 to 6 feet, balancing accessibility with accurate readings. Imagine the sky as your station’s stage, and the right mounting height as its spotlight. Too high, and it may miss ground-level changes; too low, and it could be obstructed. Aim for a clear, unobstructed view to guarantee precise weather data collection.
How Often Should I Calibrate the Sensors?
You should calibrate your sensors at least once every six months to maintain ideal sensor accuracy. Regular calibration helps guarantee your weather data remains precise, especially if environmental conditions change or sensors are exposed to dust and debris. Keep an eye on sensor readings; if you notice inconsistencies, consider calibrating more frequently. Consistent calibration frequency is key to reliable weather monitoring and accurate data collection.
Is Professional Installation Necessary?
Professional installation isn’t always necessary, but it can be helpful for precise sensor calibration and secure mounting techniques. If you’re confident in your DIY skills, you can manage the setup yourself, ensuring your weather station functions flawlessly. However, for maximum accuracy and peace of mind, especially with complex systems, consulting a professional guarantees proper sensor calibration and perfect mounting techniques, saving you time and trouble in the long run.
Conclusion
Now that you’ve set up your home weather station, it’s like planting a flag on your personal frontier of weather knowledge. Each tool and mount symbolizes your commitment to understanding nature’s whispers. Remember, your station isn’t just equipment—it’s a guardian, silently watching over your world. As the seasons change, your station stands firm, a beacon of curiosity and care. Embrace this journey, and let your weather station be a symbol of your connection to the environment around you.